The Cause and Effect of Google's h.264 Decision

20 January 2011 Posted Under: video [0] comments
 

The Cause and Effect of Google's H.264 Decision

How do the internal workings of a browser that was released only two years ago have an enormous ripple effect on the future of streaming media on the internet? Last week Google announced on their chromium blog that they’re dropping support for the h.264 codec, in favor of the open source Ogg Theora and WebM/VP8 codecs. This is yet another snag in the messy attempt to unify the playback of video in HTML 5, as we now find the #2 and #3 most popular browsers lacking support for what currently is likely the most ubiquitous encoding format. So how did we get here?

The browser wars are back

After years of IE 6 and Firefox being the only real browsers around, the browser wars have exploded again. For the first time since Netscape 4.7 roamed the earth, Internet Explorer has dropped below 50% in the market share. That leaves a lot of space for the likes of Firefox, Chrome, Safari, and Opera. Well, maybe not Opera. The interesting thing in this graph is the dominance of Firefox, and the growth of Chrome. That leaves ~42% of the current desktop browser market with no H.264 native playback, and ~96% of the next desktop browser market that supports WebM (assuming everyone here upgrades to the latest version of course).

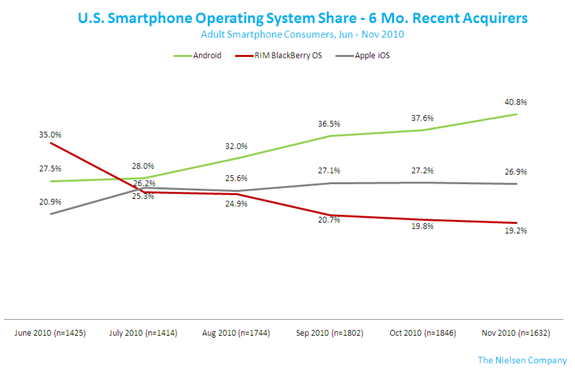
What’s scary about this is the proliferation of new browsers through mobile and embedded devices. As time goes on, iOS, Android, and RIM are going to eat more and more of those beautiful hits on our Google Analytics dashboards. While iOS is currently ahead in terms of volume, Android is catching up. Quickly.

Smartphone Market 2010

As the homogeneity of the browser market continues to disappear, the likelihood that all browsers will support the same native HTML 5 playback goes down quickly. So why did Google do this?

Is YouTube making money yet? How about now? Now?

In 2006 Google acquired YouTube for $1.65 billion in stock. The costs of running a video delivery site are sky high, and the sale price certainly turned a lot of heads. While I’ve heard a lot of people question the acquisition, there are estimates that YouTube may be generating as much as 1 billion a year in revenue moving forward. Don’t be mistaken, YouTube is a vital piece to controlling advertising in the streaming media market. They will protect their investment, and continue to grow other revenue streams to support the costs of the platform. One of the ways I look for Google to do this is through providing a channel to charge for premium or protected content. MPEG LA makes providing content encoded using H.264 free until 2016 - given the content is available freely to the end user. The moment you charge for the delivery of that content, you are subject to a delivery fee of 2% revenue per title, up to a maximum $5 million cap. While I don’t think the $5 million is a huge deal to Google, it’s an enormous deal for smaller software shops, startups, integrators, and hardware companies that want to stream and decode video from YouTube on their sites or devices. This model will eventually have a stifling effect on innovation in the streaming media market, which directly affects Google’s YouTube line of business. This pretty easily explains why Google purchased the VP8 codec from On2 for $106.5 million.

In the short term, this decision isn’t going to cause a whole lot of impact. Even if most browsers did support HTML 5, which they don’t, most of the video out there today is in H.264 format. All of the hardware devices that support decoding are using H.264. This is a decision that pays dividends 5 years down the road. Estimates have YouTube receiving as much as 24 hours of content per minute, which is dizzying to think about. No matter how you store it, that’s a ton of storage space. More and more of the content being added to the system is in high definition, so that makes the problem even bigger. Now add the fact that you need to encode your content in two different formats over the long haul, and you have a huge problem. I want to know - will Google have the stones to yank H.264 support from YouTube all together?

Where does this leave everyone?

As mentioned above, I don’t think this changes a lot in the short term. Here is where I see the big players ending up with the change:

  • Adobe - Adobe comes out of this situation in great shape. This pretty much just guarantees that flash isn’t going anywhere for a couple of years, and they’ve already announced support for VP8.
  • Microsoft - Microsoft, who doesn’t have a horse in this race anymore, has already announced VP8 support for Internet Explorer 9.
  • Google - Google gets to protect their YouTube and VP8 investments, while promoting innovation through an open standard.
  • Mozilla - Firefox will remain relevant, given their VP8 support in version 4. I doubt the Mozilla Foundation had any intentions of paying MPEG LA $5 million.
  • Apple - If Google drops H.264 support of YouTube (which won’t happen for a long time), Apple with have their hand forced into supporting WebM. Until that happens, this is a total mystery to me.

Overall, I think Google’s decision is a good thing for content developers and innovators. Not everyone agrees. For a few dissenting opinions on this, check out:

And of course, I want to know what you think. So lets start some discussions!


Bootstrapping image based bookmarklets

28 December 2010 Posted Under: web [0] comments
 

Bookmarklets

Over this holiday break I had the interesting opportunity to write a bookmarklet for a friend who runs a comic based website.   Instead of just manipulating the currently loaded page, the bookmarklet needed to send a list of images to another site.  Often when writing bookmarklets, we tend to only think of loading our code in the context of a HTML content page.  How often do you test your bookmarklets when the browser is viewing an image?  In this article I am going to go through the code I used to bootstrap my bookmarklet script, and discuss some of the interesting challenges I experienced along the way.

To get started with this code, I used a fantastic article by Tommy Saylor of Smashing Magazine. It gave me a good start, but certainly left a lot of details out, and in my case, caused a lot of bugs.

Bookmarklet Architecture

That’s right:  we should talk about architecture before diving right into our JavaScript.  When writing a bookmarklet, it’s generally a good idea to keep as much code out of the actual bookmark as possible.  This is where ‘bootstrapping’ comes into play:  we will simply use our bookmark as a piece of code that actually loads the core bits of our JavaScript.  There are actually two reasons why this is a good idea:

  • Different browsers have various max-lengths of bookmarks.  Keep in mind that a bookmarklet is kind of an accidental feature.  I think the average max length works out to around 2000 characters, but some browsers (like Internet Explorer 6) have limits as low as 508 characters.
  • Users are unlikely to be bothered into refreshing your bookmarklet.  Once somebody bookmarks your code, how are they going to get updates?  It’s much easier if your bookmarklet simply loads a JavaScript file from a static URL.  This way we can update the code in the back whenever we want.

After our bootstrapper loads the script we created, any external libraries will be loaded.  For example, I used jQuery and jQuery UI for my most recent project.  After the dependencies are loaded, we will then execute our main code.

Another thing to keep in mind when you’re building your bookmarklet is how the site behaves after the function is disabled.  For example, if your bookmarklet gives all images on the site a red border, what happens when the user no longer wishes to use the bookmarklet?  For this reason, I tend to create a cleanup method that allows our bookmarklet changes to be undone, and leaves the script in a state that can later be used again.

The bootstrap code

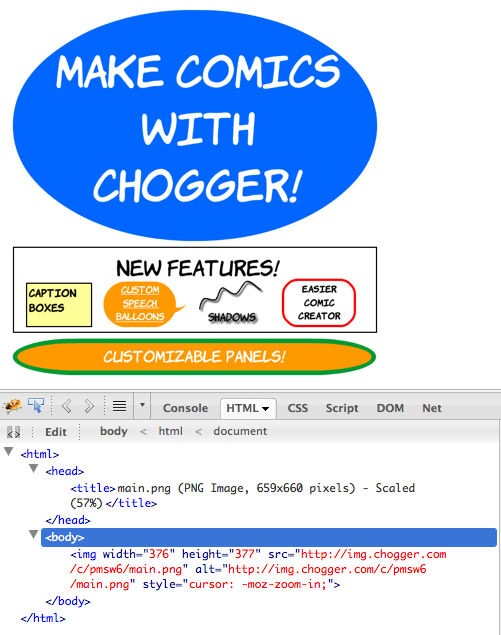
For the purposes of this bookmarklet, I needed to write a piece of code that would interact with a standard HTML page and it’s images, or interact with a page that was a single loaded image. For that reason, the first thing we need to do is determine what type of page we’re dealing with.  If the page is HTML, we can insert a script.  If the page is an image, we need to behave differently.  While I found that Firefox and WebKit both generated a HTML container to render image pages, their behavior surrounding script events of these pages were too inconsistent to be depended upon.

Image url firebug output

Here is a formatted example of what my a href tag JavaScript looks like:

// <a> tag href javascript
javascript: (function () {
  if (
    (document.contentType && document.contentType.indexOf("image/") > -1) ||
    /.png$/.test(location.href) ||
    /.jpg$/.test(location.href) ||
    /.jpeg$/.test(location.href) ||
    /.gif$/.test(location.href)
  ) {
    location.href = "https://jbeckwith.com/bookmarklet/";
  } else if (!window.main) {
    document.body.appendChild(document.createElement("script")).src =
      "https://jbeckwith.com/my-bookmarklet.js";
  } else {
    main();
  }
})();

After tidying up our script, and adding the surrounding tag, here is a final rendered output of our code, I came up with the following:

<!--
	<a> tag example
-->
<a
  href="javascript:(function(){if((document.contentType&&document.contentType.indexOf('image/')>-1)||/.png$/.test(location.href)||/.jpg$/.test(location.href)||/.jpeg$/.test(location.href)||/.gif$/.test(location.href)){location.href='https://jbeckwith.com/bookmarklet/';}else if(!window.main){document.body.appendChild(document.createElement('script')).src='https://jbeckwith.com/my-bookmarklet.js';}else{main();}})();"
  >It's a bookmarklet!</a
>

Loading jQuery and jQueryUI

Now that the bootstrapper is created, I am going to focus the rest of the article on the external JavaScript file that contains the meat of the code. With the script I wrote, I needed to use a good deal of visual effects. I am already comfortable with JQuery, so I chose to use it as my JavaScript framework:

// create javascript libraries required for main
if (typeof jQuery == "undefined") {
  // include jquery
  var jQ = document.createElement("script");
  jQ.type = "text/javascript";
  jQ.onload = getDependencies;
  jQ.onreadystatechange = function () {
    if (this.readyState == "loaded" || this.readyState == "complete") {
      getDependencies();
    } // end if
  };
  jQ.src = "https://ajax.googleapis.com/ajax/libs/jquery/1/jquery.min.js";
  document.body.appendChild(jQ);
} // end if
else {
  getDependencies();
} // end else

If you look at the example in the Smashing Magazine article, you will notice a couple of differences. We need to add an event for onreadystatechange to handle Internet Explorer. I found that IE inconsistently set the readyState of the script object to ‘loaded’ or ‘complete’ in various parts of the DOM, so as a rule I check for both. If you don’t make this change, IE will never notify the script that jQuery is finished loading.

Secondly, I have added the getDependencies() method to manage loading required scripts (in addition to jQuery). Since I am depending heavily on a few jQuery UI components, I needed to load both an external JavaScript file and an external CSS file:

function getDependencies() {
  // make sure jqueryUI is loaded
  if (!jQuery.ui) {
    // get the link css tag
    var jQCSS = document.createElement("link");
    jQCSS.type = "text/css";
    jQCSS.rel = "stylesheet";
    jQCSS.href =
      "https://ajax.googleapis.com/ajax/libs/jqueryui/1.8/themes/base/jquery-ui.css";
    document.body.appendChild(jQCSS);

    // grab jquery ui
    var jQUI = document.createElement("script");
    jQUI.type = "text/javascript";
    jQUI.src =
      "https://ajax.googleapis.com/ajax/libs/jqueryui/1.8.7/jquery-ui.min.js";
    jQUI.onload = getDependencies;
    jQUI.onreadystatechange = function () {
      if (this.readyState == "loaded" || this.readyState == "complete") {
        getDependencies();
      } // end if
    };
    document.body.appendChild(jQUI);
  } // end if
  else {
    main();
  } // end else
} // end getDependencies function

In this case, I’m really only waiting on jQuery and jQuery UI to load. If there were more dependent scripts, I would likely create an array of scripts that need to be loaded, and check all of their completion every turn through the getDepenencies method.

Embedding Styles

With the supporting code written, we’re now ready to work on our main method. This is where bookmarklets really are different based on your task. In my case, I’m creating a visual element on the page, complete with styles to match the target site. This works pretty much as expected, with a single caveat: any style definitions you create must be at the very bottom of your appended script. Internet Explorer has a nasty habit of inconsistently handling styles and scripts when appended to the DOM. For some reason beyond my understanding, appended style definitions, whether via script or ajax calls, only work if they are at the very bottom of the appended code. This is fantastically fun to figure out on your own, so hopefully I’ve saved you some trouble.

function main() {
 // only do this the first time the bar is loaded on the page
 if ($("#myBar").length == 0) {
  // append the styles and bar

  var barHtml = "<div id='myBar'>\
       <div id='myBar-main' class='dragOff'>\
        <span id='myBar-thumbs'></span>\
        <span id='myBar-text'>drag images to the mainbar</span>\
        <span id='myBar-buttons'>\
         <a href='#' id='doneLink'>done</a>\
         <a href='#' id='cancelLink'>cancel</a>\
        </span>\
       </div>\
      </div>\
      <style type='text/css'>\
        #myBar {color: #FFFFFF; font-size: 130%; font-weight: bold; left: 0; position: fixed; text-align: center; top: 0; width: 100%; z-index: 99998; display: none; }\
        #myBar-main {border-bottom: 3px solid #000000; padding: 7px 0;}\
        #myBar-buttons { display: block; float: right; margin-right: 20px; }\
        #myBar-buttons a,\
        #myBar-buttons a:visited,\
        #myBar-buttons a:link,\
        #myBar-buttons a:active,\
        #myBar-buttons a:hover\
         { padding: 4px; font-size: 0.7em; border: 2px solid #008600; background-color: #00cb00; color: #FFFFFF; text-decoration: none; }\
        #myBar-thumbs img { padding-left: 2px; padding-right: 2px; cursor: hand; }\
        .my-hover { border: 3px solid #4476b8 }\
        .dragOff { background-color: #4476b8; }\
        .dropHover{background-color: #FF0000; border: 1px dashed #e5a8a8;}\
        .dragActive {background-color: #759fd6}\
        .dropHighlight{border: 1px solid #000000;}\
        .dragHelper {z-index: 99999; border: 1px solid #000000;}\
       </style>";
  $("body").append(barHtml);

This code simply creates a formatted div and adds it to the top of the page.

Cleaning up the mess

If you look at the generated HTML above, you’ll notice that I include a cancel link. I like to give the user the option to cancel out of using the current bookmarklet, and even relaunch the bookmarklet without issue. So when you’re done, make sure to test closing and re-launching the code. I suggest keeping all of your elements on the page, and simply hiding them from the user:

// myBar close evnet
$("#cancelLink").click(function (e) {
  // hide the bar
  $("#myBar").fadeOut(750);

  // remove any img classes or handlers
  $("img").removeClass("my-hover").unbind().draggable("destroy");

  // reset the thumbnail span
  $("#myBar-thumbs").html("");

  // reset the text
  $("#myBar-text").html("drag images to the mybar");
});

And for now, that’s it. For the source to this project, visit my GitHub.


Virtual Labs

22 December 2010 Posted Under: projects [0] comments
 

Lab Header

When a student takes a course in chemistry, it is often accompanied by a hands on lab. After sitting through a lecture, and performing homework, students need to reinforce the learned concepts by doing. Why should technology education be any different? VTE Virtual Labs provide a sand-boxed environment for students to practice interacting with simple or complex ephemeral computing environments. These environments may be designed by a course instructor or instructional designer to promote learning by interacting with a real (as real as it needs to be) system. Especially useful for security research, these systems may contain full environments including domain controllers, mail servers, web servers running various versions of Windows or Linux. You can even configure internal routing and switching between virtual hosts. Students can install malware, viruses, bots, hacking tools, anything they want - and when they’re finished, the environment is completely disposed, with no harm done.

Designed at the Software Engineering Institute of Carnegie Mellon University, students and interact with the system entirely over the web, in the browser. It combines an ASP.NET MVC back end with client elements including JQuery and Adobe Flex. The back end infrastructure includes a BigIP F5, NetApp SAN, Cisco ASA, and vSphere cluster.

The Student Perspective

After watching a presentation on a particular technical topic, the student may be asked to practice their new skill inside of a virtual lab. To prepare for the lab, VTE also provides demos and quizzes. From a course syllabus, the student will select the lab they would like to launch:

Course Outline

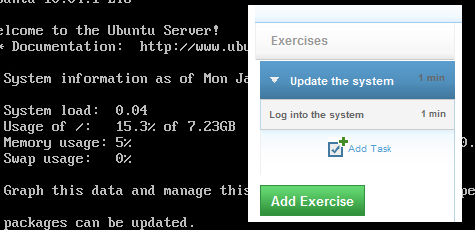
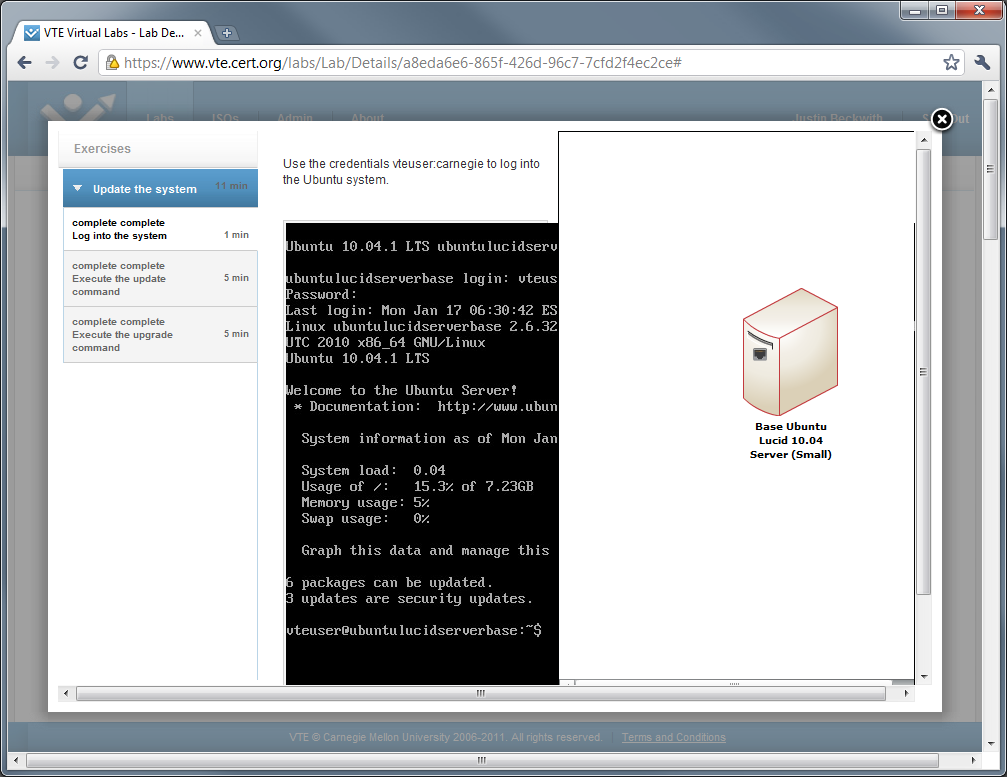
This will start spooling up the required virtual machines and networking gear in vSphere. The student is presented with a structured set of tasks they are expected to perform in order to reinforce the concepts taught in the previous lecture. As each task is completed, the student’s progress is saved, and they may come back at a later time to complete the lab:

Lab Player - The Platform and Task View

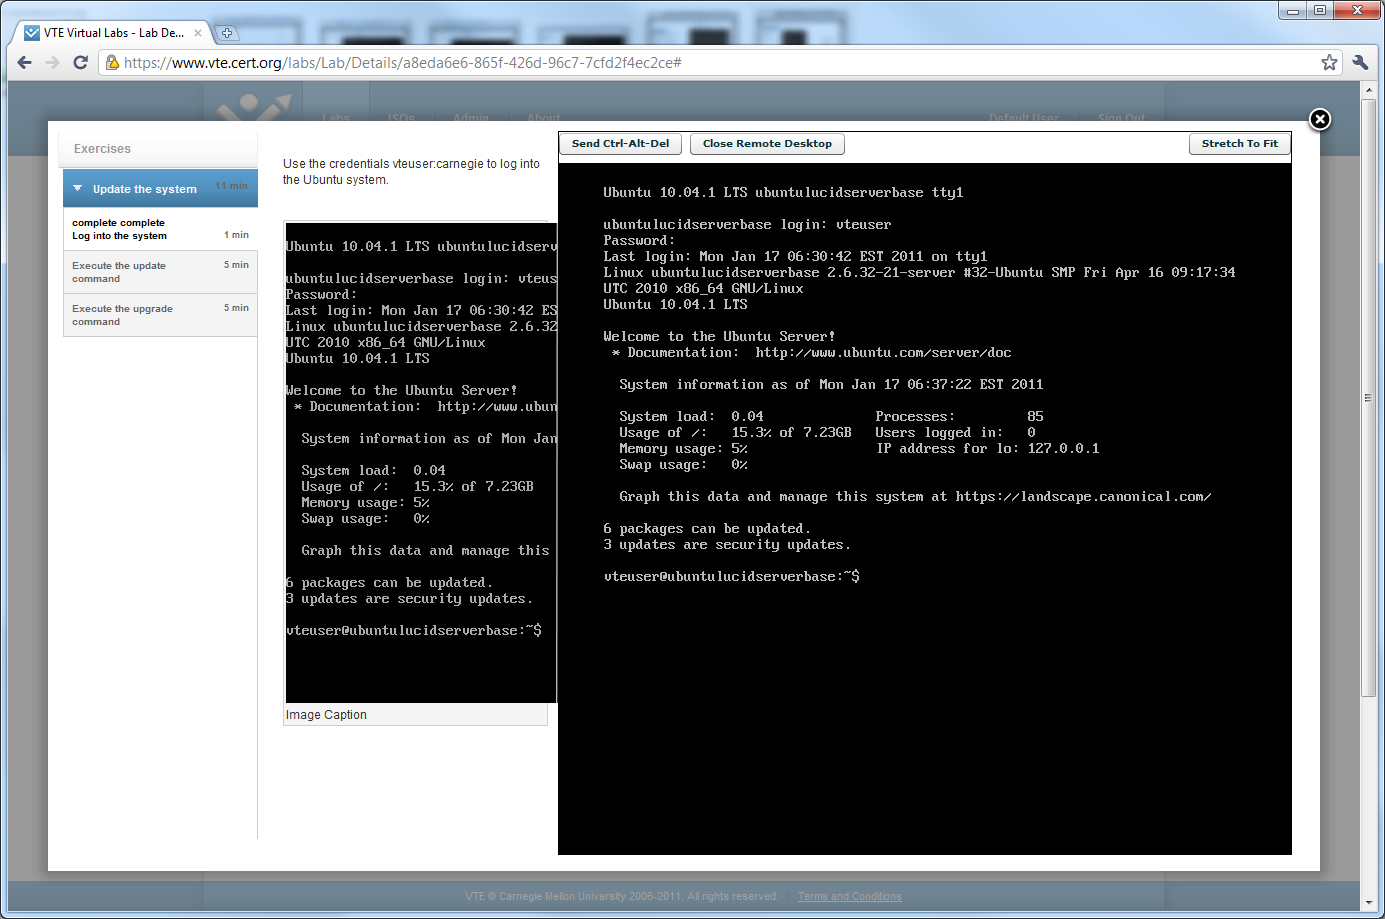
Students may select any of the virtual machines from the lab platform, and engage in a VNC session that is performed using adobe flash. The system is capable of establishing a standard VNC socket connection over 5900 or using a comet style connection to proxy the data over 80/443. The system should behave just like administering any other remote system:

Lab Player - Completing a Task

After the student completes the required steps, they are free to submit the lab, and continue on with the other work in their course.

The author perspective

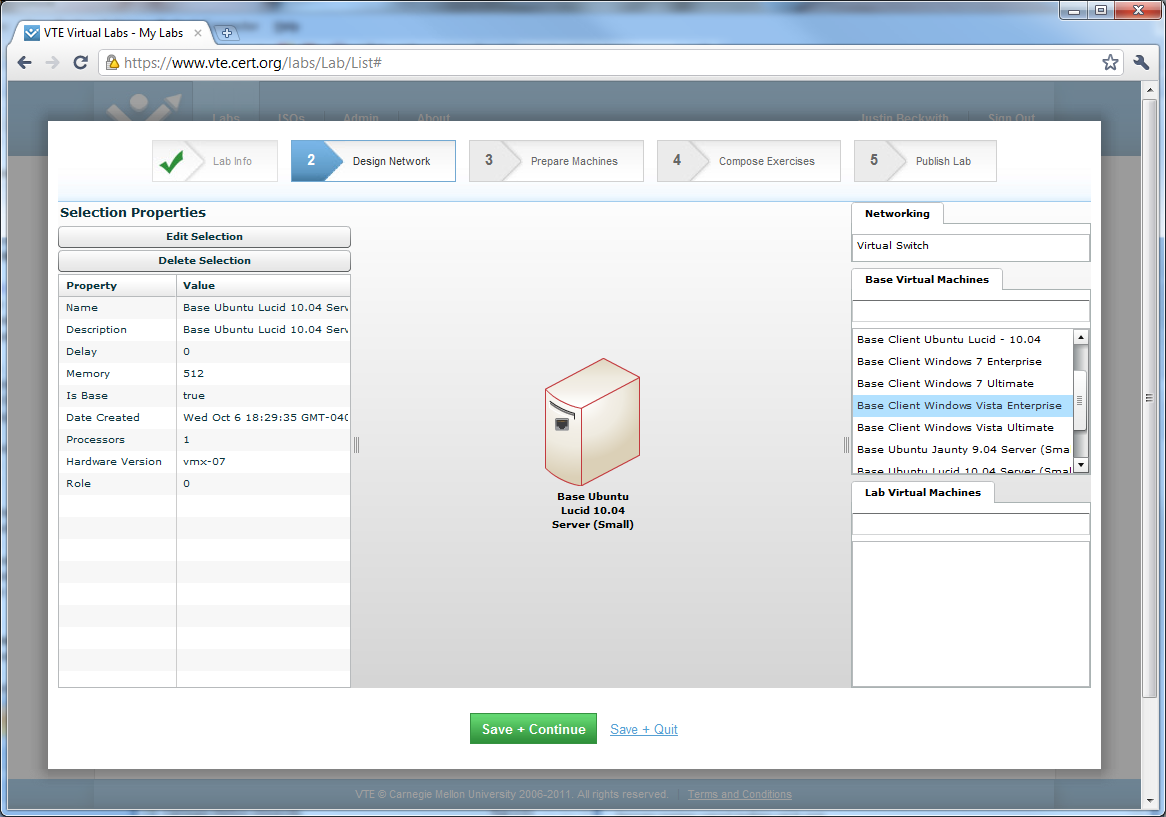
Instructors, content authors, and instructional designers have the ability to author their own virtual lab environments. After creating a new lab, you have the option to start with a list of predefined templated virtual machines, similar to what Amazon EC2 provides it’s users:

Lab Author - Base Disks

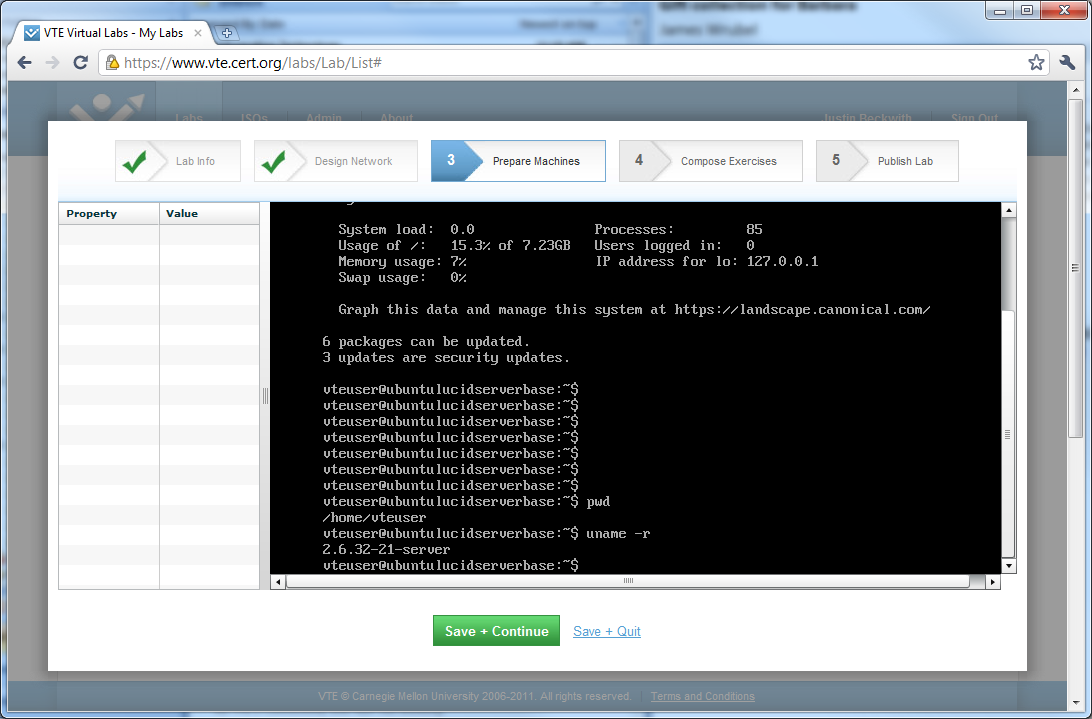
In this example, I am only going to use a single virtual machine. It’s entirely acceptable to use multiple virtual machines and multiple networking devices. After all of the machines have been dragged to the stage, they need to be prepared for an initial task authoring state. All this really means is that we’re going to copy the base image we started with, and make any changes needed for the specifics of this lab. Examples would include installing custom software, installing the latest patches, or creating files needed in order to the complete the lab. The final state of these machines in this step will represent the first step students see when they launch the exercise:

Lab Authoring - Preparing the Virtual Machines

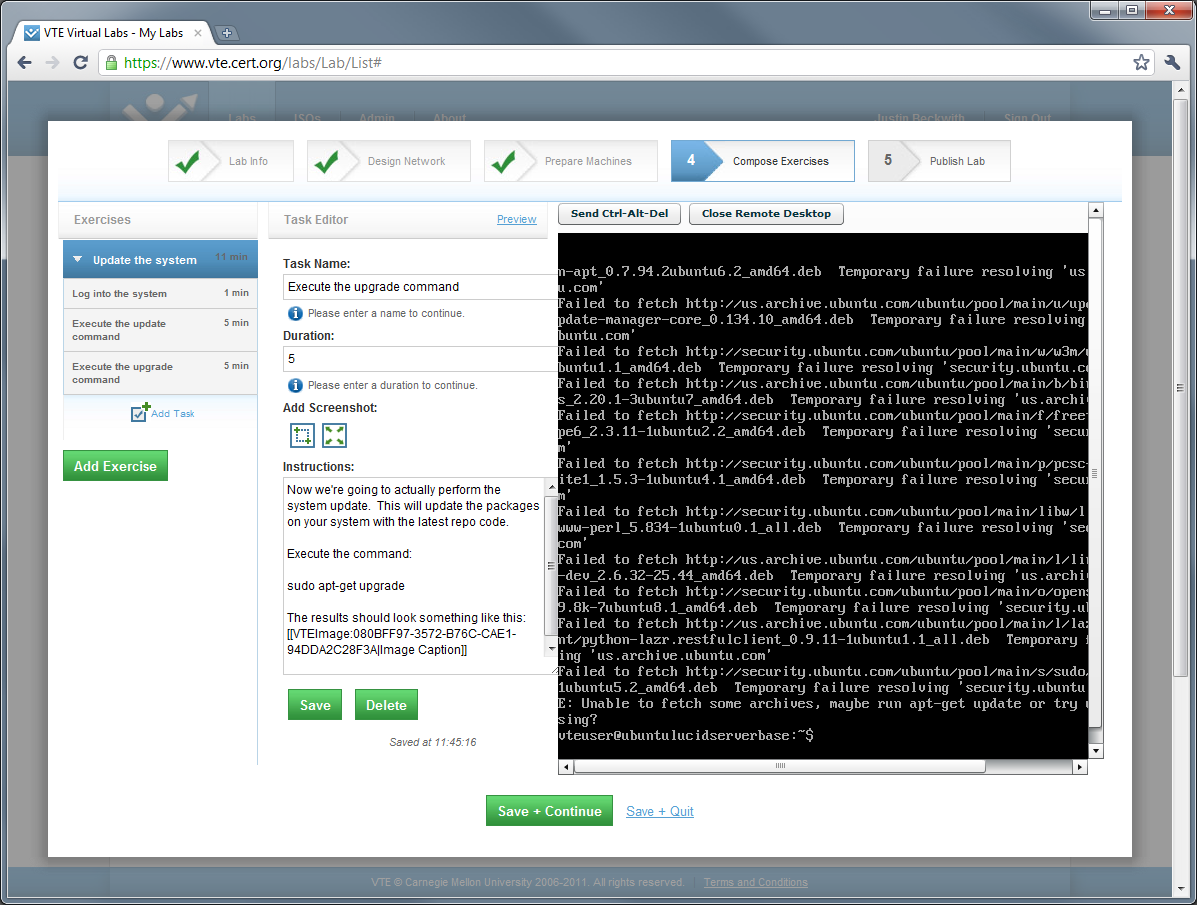
After the author has placed all of the machines in the desired start state, you can begin writing out the individual tasks of the lab. For longer labs, several exercises may be used. A single exercise should encompass a single task that may be completed in a sitting. Several exercises may be combined to create a lab with a broader theme. For example, if you wanted to create a lab on securing Linux, you would like have multiple exercises including ‘Installing and configuring the firewall’, and ‘User management’. An exercise may contain multiple tasks - a task is a simple task that be completed relatively quickly. Tasks contain a brief description on what the student is supposed to be doing in this particular step, and may contain a screen-shot of the desired result:

Lab Authoring - Tasks

Upon completion of these steps, the lab can be made available to students.

For more information, visit Virtual Labs.


Using Ant with Adobe Flex - Part 1

15 December 2010 Posted Under: flex [0] comments
 

ant build

Welcome to the first part in a multi-part series on building Adobe Flex projects using The Apache Ant Project.

So why would we want to use ant to build our flex projects?  Flash Builder does a great job of building our actionscript and mxml.  But it does not do a great job of integrating into our existing automated build frameworks.  For those of us who have been writing Java in an enterprise environment, Ant is common knowledge.  If you’ve spent any time working with the Microsoft .NET platform, you may have been exposed to NAnt or MSBuild The idea is that we need to have a reliable, repeatable build process that can execute outside of the context of our development environment.  For my team, this means an independent build server (in my case, a virtual machine).  An independent build server means nightly builds, and software that can run without the user at the keys.

Before we get started, I think it’s a good idea to run through the list of tools I’m using for this article:

  • Apache Ant - v.1.8.1
  • Flash Builder - v.4.0.1
  • Flex SDK - v.3.5.0, v.4.1.0

So lets get started!

Download, Install, and Configure Ant

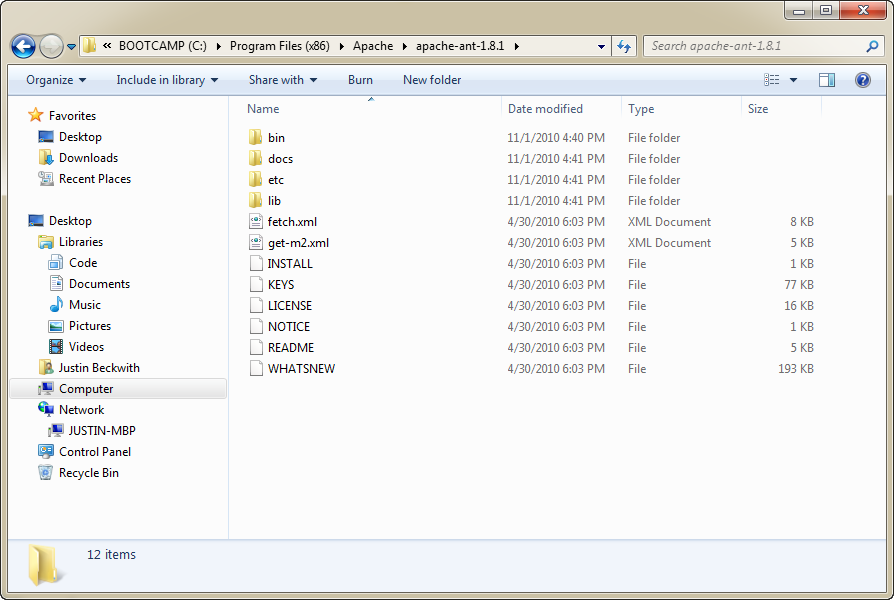
The first step is to download ant.  At the time of this article, you can download the binaries at https://ant.apache.org/bindownload.cgi.  The binaries are included as a *.zip file, so we need to unpackage our tool in a place that makes sense.  I chose to create a directory structure that was consistent with other installed software on my system:

C:\Program Files (x86)\Apache\apache-ant-1.8.1

Ant install folder

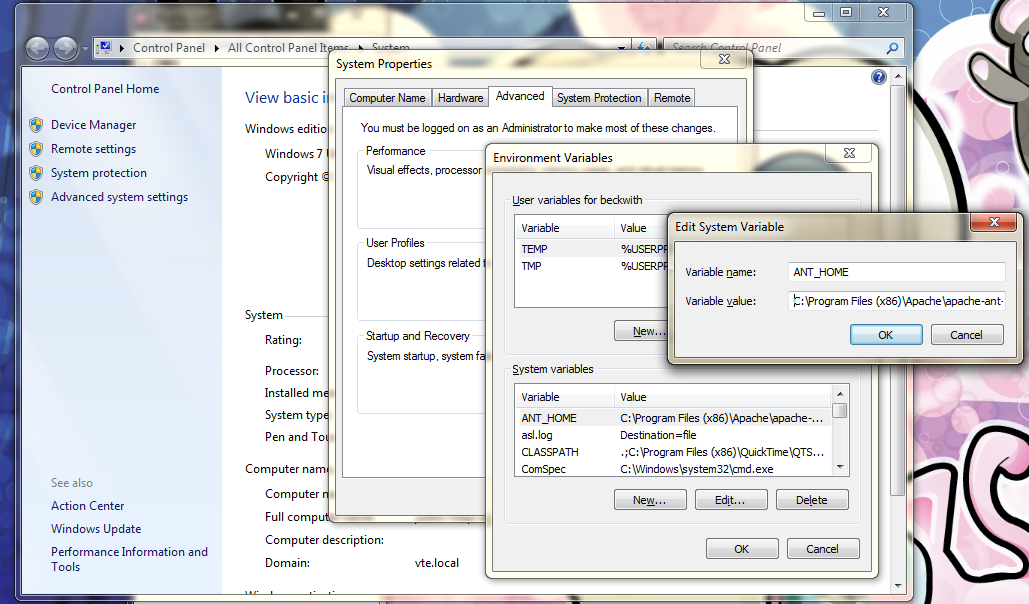
After Ant is installed in the appropriate location for your system, you need to create/modify a few system variables in order to use it.  Start by right clicking on ‘Computer’, and navigate to ‘Properties’.  Click on the ‘Advanced System Settings’ option, and then click on the ‘Environment Variables’ button.

The variable you need to create is ANT_HOME.  Under system variables, click on the ‘New…’ button.  Enter the name ANT_HOME, and enter the path you used to install Ant.  For me, this is ‘C:\Program Files (x86)\Apache\apache-ant-1.8.1’:

Setting Environment Variables

We also need to modify the PATH variable, which will allow us to invoke Ant from the command line.  Find the PATH variable in your system variables, and choose ‘Edit…’.  At the end of the existing property value, add the full path to your Ant installation, with the addition of the bin.  For me, this is ‘C:\Program Files (x86)\Apache\apache-ant-1.8.1\bin;’.  We are now ready to use Ant.

Configuring The Flex SDK

For the purposes of this post, I am going to assume that you’ve already installed Flash Builder.  In order for Ant to find the Flex SDK, we need to create an environment variable that points to the appropriate location.  Instead of creating an environment variable that points to a specific SDK directory, I like to create a variable that points to the root of all SDKs.  This allows us to choose the appropriate SDK version inside of the build file, and allows for building bits that use various SDK versions easily.  Create a new environment variable named FLEX_HOME.  Set the path to the root of your Flex SDK installations; for me this is: ‘C:\Program Files (x86)\Adobe\Adobe Flash Builder 4\sdks’.  In the case of an independent build machine, you can install the Flex SDKs you need to use independent of Flash Builder.

Configuring Flash Builder to Invoke Ant (optional)

Generally, I invoke my Ant scripts from the command line.  If you’re working from a development machine, you may choose to configure Flash Builder to invoke your Ant scripts directly from the IDE.  To get this working, I followed the tutorial listed here:

https://www.zoltanb.co.uk/Flash-Articles/fb4-standalone-how-to-install-ant-in-flash-builder-4-premium.php

To enable Ant from Flash Builder, use the following steps:

  • Go to Help > Install New Software
  • Click on Available Software Sites
  • Click on ‘Add..’
  • Type in: Name: Galileo
  • Location: https://download.eclipse.org/releases/galileo/
  • Go back to Help > Install New Software
  • Select Galileo from the drop down:
  • Wait until the List gets populated. It might take a long time!
  • Type in ‘Eclipse Java’ in the search box to narrow down the search
  • Select Eclipse Java Development Tools
  • Click on Next
  • Accept the Terms and click on Finish
  • Click on Yes to restart FB4 and apply your changes:
  • Go To Window> Other Views
  • Select Ant and click OK

These steps will allow you to build your project in Flash Builder using Ant.  Now our environment is set up and configured.  In the next part of this series, I will go over how to write your Ant scripts.


Virtual Training Environment

13 December 2010 Posted Under: projects [0] comments
 

The Virtual Training Environment (VTE) is a Learning Management System designed at the Software Engineering Institute of Carnegie Mellon University. This system is designed to provide students and instructors with a self managed ecosystem, including user generated content and aspects of social networking. It may be used for independent learners, synchronous instruction, or semi-synchronous instruction. Courses may be built using SCORM content, RECast presentations, podcasts, demos, quizzes, surveys, assignments, or virtual labs.

I am going to do a detailed writeup on this system in the future, but until our launch, here is a gallery of screen-shots:

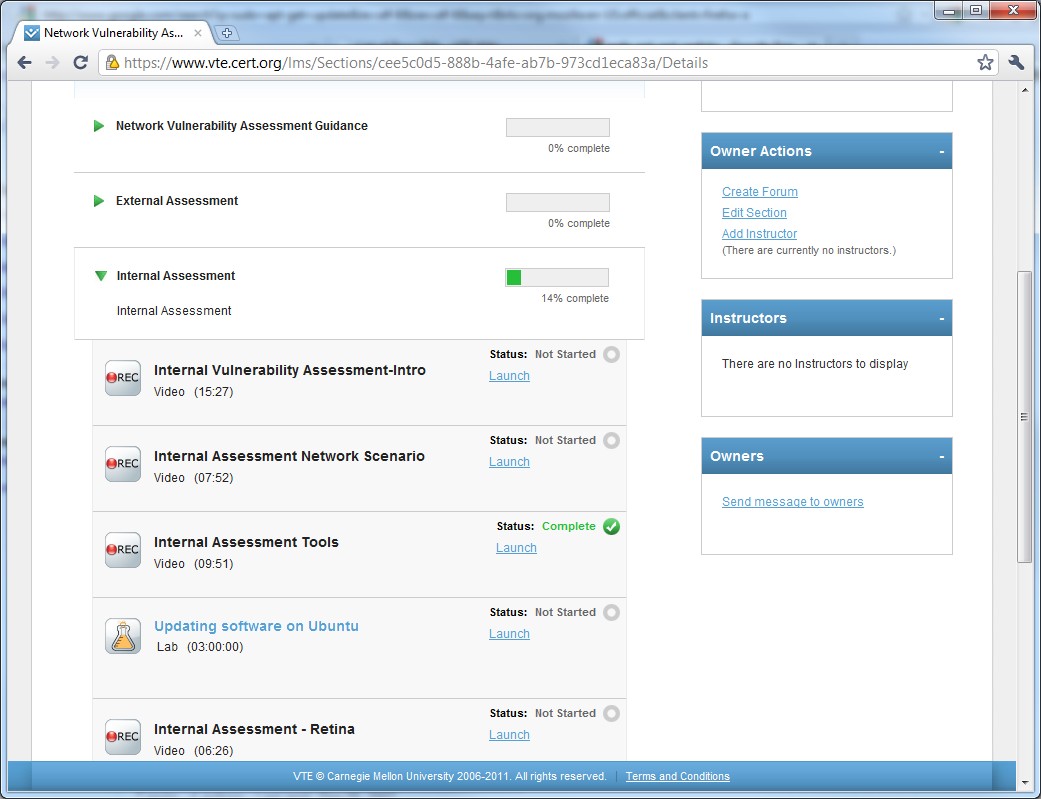
LMS Section Details

LMS Launch RECast

LMS Notifications

LMS Course Enrollment

LMS Contact Instructors

For more information, visit https://vte.cert.org/lms/